Revell 85-8883 1/4 nähtava V-8 mootori plastikust mudelikomplekt, 12-tolline, mitmevärviline

Brand:Revell

3.3/5

183.26

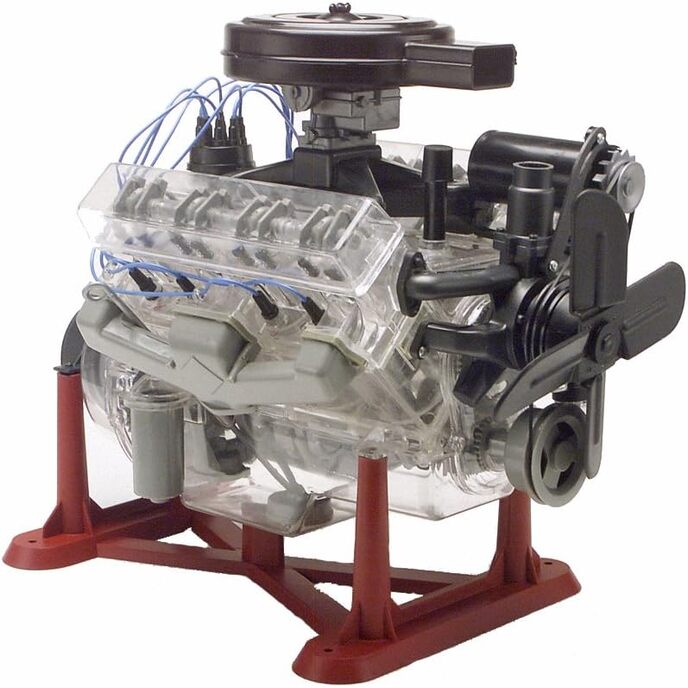
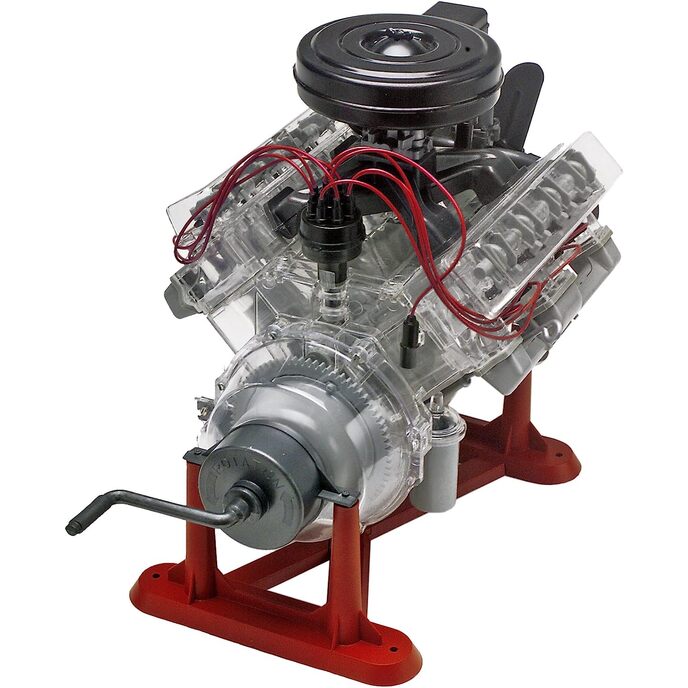
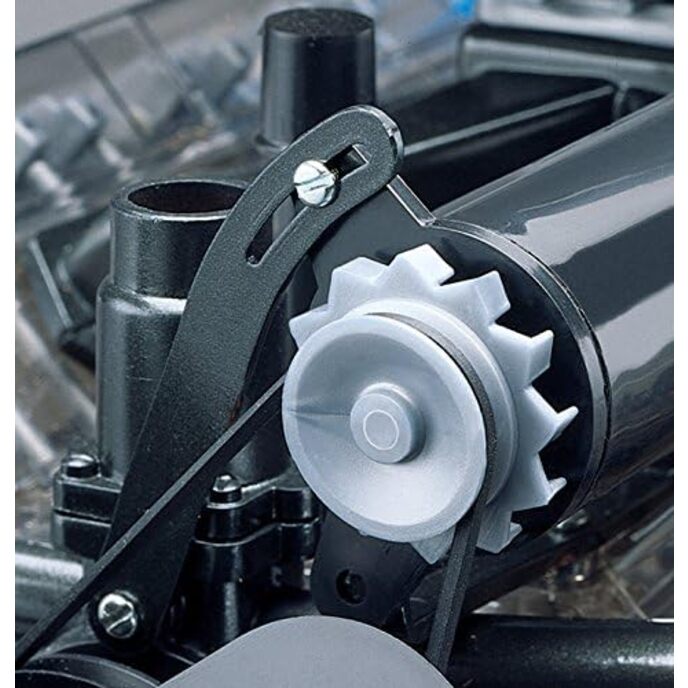
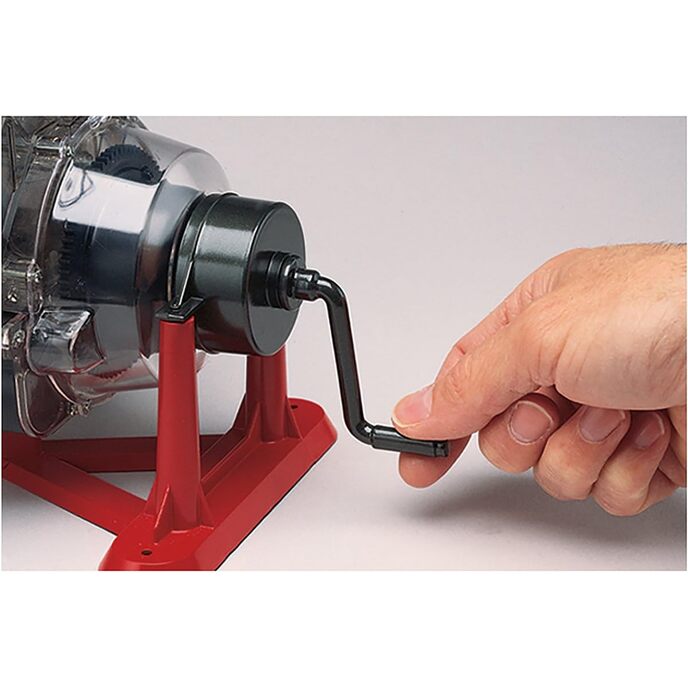
TOOTE KIRJELDUS Revelli mootori plastikust montaažikomplekt Visible V-8 võitis 2008. aasta Parents Choice Awardi ja 1995. aasta hõbedase autasu – Doing & Learning Toys. Komplekt sisaldab osi, mis on valatud läbipaistvast metallist süsi, mustast ja hõbedast. Käsivänt juhib kolbe, nukkvõlli klappe ja klappe. Komplekti kuulub kummist ventilaatoririhm ja vinüülist süütejuhtmed ning ehituseks vitriin ja kruvikeeraja. Vajalik on liim ja värv (ei kuulu komplekti). Toode on mõeldud alates 12. eluaastast. 1:4 mõõtkavas. Mootor Visible V-8 meeldib kindlasti lastele, harrastajatele ja autofännidele.Modelite ehitamine on suurepärane viis õppimisoskuste arendamiseks ja osavuse suurendamiseks.Liituge modelliehituse maailmaga. Mudeli ehitamisega kaasnevad rahulolud. Kuid kas teadsite, et uuringud näitavad, et mudeli loomine võib aidata arendada koordinatsiooni, parandada osavust ja edendada lugemisoskusi? Lisaks on see suurepärane viis loovuse inspireerimiseks ja maailma populaarseimate sõidukite ja kujundite ajaloo tundmaõppimiseks! Olenemata sellest, kas olete selle hobiga uustulnuk, kogenud ehitaja või lihtsalt otsite projekti, mida lapse või lapselapsega jagada, on aeg avastada põnevust, kui saate öelda: "Ma tegin selle!" The Story Behind the Model Kas olete kunagi mõelnud, kuidas V-8 mootor töötab? Kas olete alati soovinud väikest V-8 plastikust koopiat, mis istuks teie lauale ja avaldaks sõpradele muljet? Kui vastate kummalegi küsimusele jaatavalt, peaksite ehitama Revelli 1/4 skaalal nähtava V-8 mootori. Mis oleks parem viis sisepõlemismootori töö nägemiseks, kui kõigi osade liikumine! Vända keerates liiguvad kõik osad nagu päris. Suurepärane õppevahend V-8 mootori sisemise töö ja ehituse kohta! Kasulikud näpunäited nähtava V-8 mootori ehitamiseks on 3. taseme komplekt – see sobib suurepäraselt keskmise tasemega ja edasijõudnutele mudeliehitajatele. Soovitatav on vanemlik järelevalve. Enne alustamist uurige alati pakendis olevaid koostejooniseid. Iga osa on identifitseeritud osa numbriga. Enne osa kokkupanemist on soovitatav kärpida, et eemaldada üleliigne plastik, ja viilida, et siluda. Värvi ja kleebiste paremaks nakkumiseks peske plastosad lahjas pesuvahendis. Loputage ja laske õhu käes kuivada. Enne tsementeerimist kontrollige iga detaili sobivust. Enne osade käsitsemist laske värvil põhjalikult kuivada. See ei ole tegelikult töötav mootor; see on mõeldud ainult kuvamiseks. Kui teile meeldib see mudelikomplekt, ärge jätke mööda meie Plymouth 426 Hemi 'Cuda mootorikomplekti. Mis on karbis? 314 osa, kruvikeeraja ja täielikult illustreeritud kasutusjuhend. Uskumatud detailid annavad teile mudeli, mille üle uhkeldate. TOOTJALT See Revelli 1:4 skaalal nähtav V-8 mootori plastikust montaažikomplekt on 2008. aasta Parents Choice Awardi ja 1995. aasta mänguasjade tegemise ja õppimise hõbedase autasu võitja. Mis oleks parem viis näha, kuidas sisepõlemismootor töötab, kui näha kõigi osade liikumist. Vända keerates liiguvad kõik osad nagu päris. Visible V8 mootoril on liikuvad kolvid ja ühendusvardad. Käsivänt juhib kolbe, nukkvõlli klappe ja klappe. Komplekt sisaldab kummist ventilaatoririhma ja vinüülist süütejuhtmeid. Suurepärane õppevahend V-8 mootori sisemise töö ja ehituse kohta.

Illustreeritud kokkupanekujuhised. Mudeli mõõtkava 1:4. Kaasas vitriinalus. Käsivänt liigutab kolbe. Revell Plastic Model Engine Kit #85-8883 on oskuste tase 5 ja sisaldab 314 osa. Soovitatav alates 13. eluaastast.
Age Range (Description) 36 months to 96 months
Brand Revell
Cartoon Character (-)
Color Multi
Customer Reviews 4.3 4.3 out of 5 stars 894 ratings 4.3 out of 5 stars
Included Components Plastic Model Visible V-8 Engine Kit, Assembly Instructions
Is Discontinued By Manufacturer No
Item Dimensions LxWxH 22.2 x 16.6 x 4.59 inches
Item model number 85-8883
Item Weight 0.289 ounces
Item Weight 8.2 Grams
Manufacturer Revell
Manufacturer recommended age 8 years and up
Material Plastic
Model Name Visible V8 Engine Model Kit 1:4 Scale
Number of Pieces 314
Product Dimensions 22.2 x 16.6 x 4.59 inches
Scale 1:4
Style Box
Theme Building, Vehicle, Model Kits

3.3

8 Review
5 Star
67
4 Star
15
3 Star
8
2 Star
3
1 Star
7

Kirjutage oma arvustus

Teie e-posti ei avaldata. Kõik kohustuslikud väljad on tähistatud tähisega*

Scritto da: DavidTN
Fun to Build
I’m an old retired mechanic. I have been wanting to build one of these for a long time. I finally got the time to do it. I was very patient. I spent the first day, (about 6 hours) just trimming parts and looking through the directions. It took another 3 days, or so, to complete. Some pieces MUST be allowed to dry thoroughly before proceeding. Most of the parts fit very well. However, some pieces need to be ‘shifted/pushed’. Its wise to pre-fit, and understand how everything is going together, and, some temporary assembly is also helpful. The finished engine looks very good, with some mis-alignment where the water pump matches up with the heads; mostly caused by slight warpage in a front clear piece. Its minor to me. The box recommends paint. But I think that is an error. This model looks great without painting. Instead of adding detail and realism, I believe painting just distracts from the purpose of this model. (Having said that, there are exceptions. Some of the pictures other builders have uploaded, are impressive.) I used Canola vegetable oil, It seems to be working fine. You really need to be careful to clean the oil off the end of the rocker arm shaft, before gluing the cap on. And then work that closest rocker arm back and forth, to be sure no glue is stuck to it. (OR, just lubricate it after gluing.) DON”T apply oil to the cylinder walls. It is not necessary, as the pistons are a loose fit. The oil will just cloud up the view. I used Testors Clear Parts Cement where it said to use epoxy. I think the clear parts glue worked very well. It takes longer to dry, but it also gives you time to clean any glue from the threads, and you can even install the screw, and tighten the nut into the hole, getting it perfected centered. AND, it dries clear. The screws and nuts in my kit were nearly perfect. The sole exception was putting the screw through the generator bracket into the thermostat housing. I had to enlarge the hole opening a little bit, then it worked. It is a copy of an old small block Chevrolet. (Although, you can modify it to look like other engines.) If you assemble it correctly, the valves and pistons are in correct ‘time’. HOWEVER…some fool put the rotation direction on the bell housing pointing in the wrong direction. The engine actually turns clockwise…looking at it from the front. (The same as a real engine.) It doesn’t hurt to turn the wrong direction, its just that the valves work backwards then. It has great detail, and a lot of parts. I actually would have liked to have seen even more detail. Such as, a timing chain, camshaft bearings, a rotating distributor shaft, and a clear distributor cap. They also need to include spark plug wire looms. My pictures do not show them, but I have some split wire wraps on the way from Amazon. That should make the wires look better. Interestingly, if you build this correctly, some of the important items can be disassembled. You can add oil to the parts, or even swap out pistons, heads, etc. I don’t really see this as a great father/son project. This is a model you will need to concentrate on. (I believe this is the same, or very similar to a model engine that I tried to build 45 years ago…and failed. If my memory is correct, I gave up after messing up installing the nuts. I had them crooked, with glue in the threads. But, back then, we didn’t blame others, for our own failures, like I see many reviewers here doing.)
Scritto da: Stephen R. Polanek
Nice product with one caveat
This is a really nice model, but I would suggest testing the movement carefully at each step. When I added the pushrods they created a little too much resistance to the rotational motion of the motor and snapped the timing gear. I glued it and shortened the pushrods slightly and it works fine.
Scritto da: 02SS0384
Minor issues but still enjoyable
To be honest I was very apprehensive about purchasing this kit after reading all the reviews but I decided to take a chance and our 10yo and I completed the kit last night. All-in-all it wasn't a bad kit, it just needed a little attention to detail. After reading the reviews I decided to purchase a few things to prevent some of the common issues. There was mention that the screws and nuts were now metric and did not fitting correctly so I purchased some SAE items to replace them (#2-56 hex nuts, #2-56 1/2" screws and #2-56 1/4" screws). I also purchased a needle file set, Labelle 108 plastic safe oil, and a starter kit that included sandpaper and a razor knife. As stated in other reviews there is a lot of "flash" or extra plastic on many parts that will need to be cleaned up, that's where the file set came in (good investment!). Use sand paper on the round parts because the molding seams will hamper the rotation of the engine. As far as fitment, you need to test fit everything several times to make sure it fits right. We found some issues when putting the actual engine block together, I had to trim off the locator blocks from the front and rear pieces with a knife because they were hitting the cylinder parts and wouldn't let them sit flush which really messed up the fitment of the crank and cam shaft. No real issue to doing this since the parts attach with screws anyways. Other than that just some minor adjustments here and there to get everything to fit and operate smooth. The kit was missing one piece (a bearing cap), but using the Revell order page we had the replacement in about a week (free). The only other deviation we did was we used super glue in place of the epoxy; but if I had to do it again I would just use the standard fast drying plastic cement for all parts, super glue tended to haze the clear parts. As far as an educational tool I think it was outstanding. The kit comes with a "How engine's work" book which we sat down and read to start off. During the build I would explain exactly what every part was and what it did. The next day I would point out parts and have him tell me what they were and what they did. It took us about three weeks to complete working and average of 1 hour after work and usually 5 days a week. Would I purchase the kit again? Absolutely yes, very enjoyable to put together and he can't stop talking about it to family and friends...and he learned something in the process. The kit just takes a little patience, some modeling skill and maybe to some degree a little working knowledge of engines. I gave it 4/5 stars simply because of the small fitment issues and flash but the model is working smooth so far.
Scritto da: Amazon Customer
Some parts warped and instructions not clear and minimal
Some of the larger parts were quite warped and took a lot of fitting to place properly. In some cases simply could not be quite fitted right. My husband has done his own motor jobs but still found the instructions extremely minimal and in places unclear, especially as to gluing. Consequently model does not quite work as it should. Disappointing. Otherwise an interesting and fun model to put together.
Scritto da: G. Mowbray
Illustrates the inner workings of a V8 engine
Bought as a birthday present for my son who has an old USA car fitted with a v8 engine. Said he thoroughly enjoyed building the kit. Some of the parts had moulding flare which needed carefully trimming off before assembling and applying adhesive. No glue contained in the kit which at the fairly high price charged for the V8 engine kit I thought would have been included by Revel at very little cost to them..
Scritto da: Vivo_Amor_Risa
Extremely cheaply made!!!!
Extremely cheaply made!!!! Separating the parts to start the build breaks very uneven causing the assembly to be lopsided.
Scritto da: Tony Holiday
Revell are living on past success.
Had to dismantle model several times. Diagrams in manual not very explanatory.
Scritto da: Robert
Pretty accurate depiction of an actual V8
Working distributor with small LED plugs and battery pack would of been nice. Carefully read 3 steps ahead before assembly because the order of assembly is not right ie:nuts Valve covers and oil pan don’t hold very well unless you glue Neat project but pretty difficult, even for a 70 year old who’s been around engines all his life Excellent teaching tool

Seotud tooted

hot

Avastage meie rahvusvaheline võrgustik

Saadame 28 riiki, üle 200 000 toote. Olge kursis, tellige uudiskiri.

Array